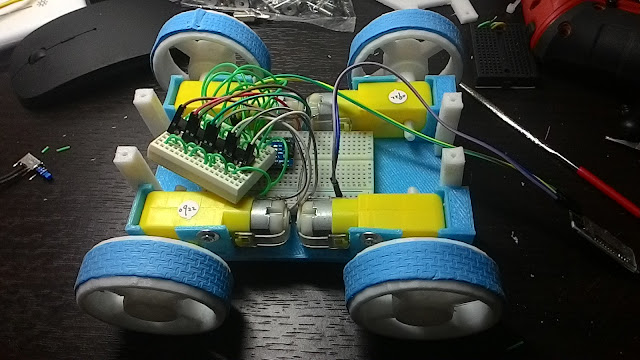
這是我自己用3D印表機+Arduino設計的藍芽智慧小車,目前已完成了下面功能
1. 手機遙控模式:用android手機遙控藍芽智慧小車
2. 自走模式-------: 自走自動避障模式 ,防止掉落,靠近懸涯邊癌粽動後退改向
3. 循跡模式------:自動走線 (不反光黑線)
可以從底下網址下載我設計的3D圖檔
http://www.thingiverse.com/thing:1104057
## I build a Bluetooth Smart Car with 3DP & Arduino.There below functions .
1.Mobile phone control mode -using Android control the BT_SmartCar
2.Auto mode-It cam auto avoid stuff and randomly change the move direction.
3.Line search mode ,Just Walking along the black line.
You can download my BT_SmartCar 3DP elements from below website.
http://www.thingiverse.com/thing:1104057
底下先介紹3D列印機構的組裝,
##Below are the assembly steps.
<Picture 1> 全部機構件,黃色部分的是一般常見的可買到的減速馬達組,我用了四顆所以她其實是四驅車.
<Picture 1> All elements ,for the yellow parts are the generic motor modules.I used 4 motors.
<Picture2> 底盤部分,裝置馬達時要注意不須太用力即可塞進重點是角度
<Picture2> This is the chassis part ,when you put the motor modules just care the angle .Don;t push too strong.
<Picture3> 裝好馬達的上視圖
<Picture 3>Top view
<Picture4> 裝好馬達的側視圖,馬達中間有一黃色小圓突出物只有一邊有,如果塞不進去就換邊裝,在這裡不需在意馬達正反轉裝置,馬達正反轉之後皆可用電路或是軟體設定.所以這裡這裡只需裝進去即可不用在意方向.
<Picture 4> Left view ,at this moment,don;t care about the motor move direction,later we can set it by H/W circuits or software.
<Picture5> 中間剛好可以放麵包版或PCB線路板
<Picture 5> You can put your PCB inside.
<Picture 6> 利用底下這個防撞條來製作輪胎(大創可買到)
<Picture 6>We used below rubber to do the tire .
<Picture 7> 底下是用3D 印表機列印出來的輪胎框
<Picture 7>Below is the wheel frame.
<Picture 8> 用這兩個素材來製作漂亮的輪胎
<Picture 8>Using the two material to make the wheels.
<Picture 9>把防撞條剪成適合寬度及長度然猴直接黏在印出來的輪胎框架
<Picture 9>Cuting the suitable size for the wheel frame and sticking.
<Picture 10>把防撞條剪成適合寬度及長度然猴直接黏在印出來的輪胎框架,把多餘的修剪掉
<Picture 10> Just cut the remainder material.
<Picture 11>在交接處再用快乾補強防止實際高速滾動時鬆開
<Picture 11>It is better to gule it more on the cross section.
<Picture 12>完成,現在你有個漂亮的藍色輪胎了
<Picture 12>Now,The Beautiful blue Wheel.
<Picture 13>正面中間是要跟減速馬達做連接的,一開始可能有點緊可以稍微打磨一下
<Picture 13> The hole is for connecting with the motor modules,if it is too tight ,you can mill it a little.
<Picture14>做好輪子後幾可跟下面四根小柱子裝上已裝好的底盤
<Picture 14 > Then,You can lock the 4 pillars on the chassis.
<Picture15> 這時你可以組裝好你的硬體線路後再把剩下的上蓋鎖上
<Picture 15>now ,you can finish your H/W desing here.then put on the platform up side.
<Picture 16>底下這個是我專門為超音波感測器(HC-SR04)做的支撐架,自動避障的功能主要來自這個感測器所以裝時注意部要裝歪了.
<Picture 16>below the fixer is for the Supersonic sensor (HC-SR04).
<Picture17 >放進超音波感測器(HC-SR04)去大小應該剛好
<Picture 17>The size should be suitable.
<Picture 18>接著所在前端這兩個孔
<Picture 18> Lock it on the two hole.
<Picture 19>PLA材質很適合用鎖木頭的尖頭螺絲,強烈建議要用電動螺絲起子(充電式3.7V-4.xV的電動螺絲起子就可了)否則會很吃力
<Picture 19>It is better to use the electricity tool to lock it.
P.S 其實市面上標榜3.7V 或是4.8V的電動螺絲起子其實都只是一個鋰電池,例外還有12V 18V 24V 差別其實就是3節4節或6節串連的18650鋰電池,電壓越高的扭力越大18V,24V大蓋都可以鑽牆了,鎖小螺絲用3.7V的就夠了體積小好拿. 鎖家具(如IKEA)可用12V ,鑽牆大概要18V/24V以上比較好.
<Picture 20> 完成超音波感測器安裝,像兩個小眼睛可愛吧?
<Picture 20> like eyes ,is it cute?
<Picture 21> 另外在超音波感測器的正下方有開一個孔這裡可以放在紅外線感測器模組直接鎖上去即可,這樣就可以來製作循跡模式及防止掉落.
<Picture 21> There is a hole under the supersonic ,you can lock the line sensor here.
<Picture 22>最後把這個上蓋鎖上四根小柱子後,再放上電池盒即可完工.
<Picture 22>Finally,Put on the platform and lock it.
<Picture 22>我是採用兩顆18650的鋰電池
<Picture 22>I put the two 18650 Li battery for it.
<Picture 23>側面
<Picture 23>Right view.
<Picture 24> 這是第1台測試完工的車子 ,顏色不一樣
<Picture 24> This is the fisrt one I made .The green color.
有關軟體可以看下列連結:
##Regarding H/W & Arduino sample code please see below link.
Build the BT_SmartCar with 3DP & Arduino -HW/SW part(用3D列印和arduino製作藍芽智慧小車-軟硬體部分)
有關android 手機APP的程式可以參考另一篇貼文
##and about Android APP you can reference below.
Building the Android APP to control Arduino Smart Car (製作Android APP控制Arduino 智慧車)
底下就先來看看之前測試的影片吧,
##Demo Films:
1.自走避障模式
2.手機遙控模式
DEMO FILM Mode 2:Mobile Phone controlled mode.
3.循跡模式
One more thing I made for 18650 case.
18650 Batter case


